i started out printing out the numbers and letters i wanted on my printer. i think it was called imprint something.
next i laid freezer paper on top of the image. yes freezer paper. who knew? it's over by the foil at the grocery store.
i cut out the image with an xacto knife to make my "stencil"
REALLY???? my hands look like i'm 80. anyway.
you then iron the freezer paper "stencil" to your fabric plastic-y side down. i have no idea if it matters but i turned my steam off on my iron. it will attach the paper to your fabric temporarily. btw- the "fabric" i used is painters drop cloths from Lowes. i washed and dried and iron them before i statred any of this. i may have to do a whole post on drop cloths. they are AWESOME.
 |
after i ironed the paper onto the fabric i spray painted the pillow making sure the whole pillow was covered.
i absolutely could not wait until it dried so i peeled the freezer paper off right away.
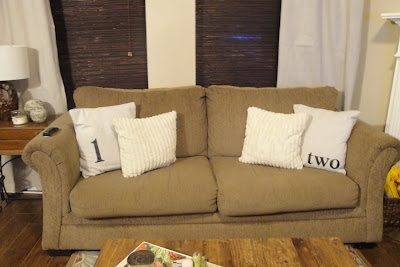
after doing all of my pillows i let them dry overnight. and then sewed them to fit my pillow forms. and here's what i ended up with.
wanna see them all together???? huh????
things i learned:
* i would have made my font bigger...much bigger
* the fabric spray paint is MESSY. i think i will sponge it on next time.
* maybe i would be a little more patient before i pull off the paper.
see that coffee table???...that will be in a post soon. my hubby and i just made that for our living room. hope you like this and i hope you'll come back. and don't forget to follow us and comment on posts so you'll be in the running for a giveaway.
jan
<a href="http://thediyshowoff.blogspot.com/" target="_blank"><img border="0" alt="The DIY Show Off" src="http://i899.photobucket.com/albums/ac195/Roeshel/DIYShowOffbuttonsmall.jpg" /></a><br />


Okay my most crafty friend, a few things.....
ReplyDeleteThe pillows look great! You know you have made an impression when Phil walks into your living room and notices the craft. That's big!
Also, your hands don't look 80 in person. The look very young and cute!
I almost choked on my coffee reading about the boys. Well behaved and well mannered, yes! Quiet, still, clean, hmmm?!? :)
Looking forward to the next tutorial. Great job!