my factory cart coffee table made it to pinterest. i haven't talked about it before but i am ADDICTED to pinterest. like it is so bad i might need professional help. after reading the comments about the coffee table, i tried to comment back to all of you who left comments, but i couldn't figure out how. i know...lame. i've tried a million times. why can't i figure this tiny thing out??? i can build a factory cart coffee table, set up a blog, post about my table, upload pics to go in the blog...but i can't figure out how to reply to a bleepity bleep comment. really?? anyway enough of my ranting. my coffee table made it to pinterest. i tried to tell the hubs it was like making it to the NBA of crafts and you know what i got...chirp...chirp...chirp. he didn't get it. oh well, i get it. it's PINTEREST.
so with all of that said...thank you to all who commented on my post. i appreciate all of your support. and thank you to the great folks at www.knockoffdecor.com for showing my post. gotta go pin.
Sunday, August 28, 2011
Wednesday, August 24, 2011
chippy paint
okay, i HAD to talk about this. i am usually not this excited about a craft i do. but i have been trying to figure out how to get the look of "chipping paint" for a long time. i have tried using a candle to rub wax on the wood and that works pretty well. but i LOVE this look.

here's what i did. i stained my wood (with my new favorite color - provincial) and then took soap and scraped it along the sides and corners. i rubbed the soap over the top of the detail part of the piece as well. this wasn't just any soap though. i got it at michaels or hobby lobby. sorry i don't have a pic. i bought it a long time ago and the package is long gone. it is over in the soap making section of the store. it comes in a bag (pink bag maybe) and it is small white squares. this soap is softer than regular bar soap. as i scraped it on the wood i kind of pressed it down onto the wood. i so wish i had taken pictures of the process, but i had no idea i was going to love the outcome so much. i promise to do more and take pics. after i soaped them up, i sprayed them with heirloom white spray paint. after they dried, i took a metal scraper and just scraped away. anywhere there was soap, the paint just comes off. here's a close up.

and here's a "B"

i realize it is sideways. i'm a little sideways sometimes. anyway, this is my new fav distressing method. try it.
jb
Tuesday, August 23, 2011
factory cart coffe table
well school is back in. YIPPEE...oh, did i say that out loud? both of the kids had great days and had A LOT to talk about after school. i guess i should be grateful, before long they won't want to talk to me at all. anyway, in my last post i mentioned the factory cart coffee table shown in the last pic of the tut. well despite the fact that i could not come up with a more clever title for this post, here goes...
i have wanted one of these FOREVER. i had seen one at restoration hardware years ago http://www.restorationhardware.com/catalog/product/product.jsp?productId=prod1558003 it is just a tiny bit out of my price range. so i just forgot about it...until a few months ago (i really don't even remember what i was looking for) but i came across http://ana-white.com/2011/07/factory-cart-coffee-table this website is awesome. they have plans for everything. well it just gave me the boost i needed and so there i went half cocked and decided to try this myself.
i first searched the internet for new casters. i wanted the really big wheels. i didn't have much luck so i went to ebay and found some vintage ones. i searched for "vintage cast iron wheels". there were a lot to choose from. the price wasn't too bad but the shipping was crazy because they a soooo heavy. this is what i came up with.
i also went to my neighborhood lowes and had a few pieces of wood cut. they were very helpful. i wasn't the most decisive person that day. i had all of my measurements written down and changed my mind at the last minute and i do mean last minute. he was about to bring the blade down and i am running down the aisle like an idiot screaming "have you cut yet??? have you cut yet?". in the end we got it all figured out and these are the measurements we used.
1 - 2 x 8 x 6 board cut into 2 - 20 inch lengths
1 - 2 x 8 x 6 board cut into 2 - 40 inch lengths
2 - 1 x 6 x 10 boards cut into 8 - 24 inch lengths
save the scraps for other projects. i had the guy cut mine for some picture holders i will tut about later.
i brought all the wood home and let the kids loose with hammers, kitchen utensils, screw drivers, etc. we need some distressing. this table is 100 years old ;). it didn't just come from lowes 10 minutes ago. i just noticed that the kids do not look all that enthused about helping me with this project. it is about 4000 degrees outside. but they pulled through for me and beat the crap out of those boards.

our next step was to make the box with the 2 x 8 pieces. we used wood glue and long screws.


we then dry fit the 1 x 6 pieces on top. (i have no pic of that ????) when we had them even on all sides we glued and nailed them. yes, nailed not screwed. according to my wise husband "they would not have used screws back then." so we pre-drilled and nailed all the boards in. and then the stain went on. i am usually a dark walnut girl but i am going a little lighter these days so i used a color called provincial. and i love it. it may be my new fav.
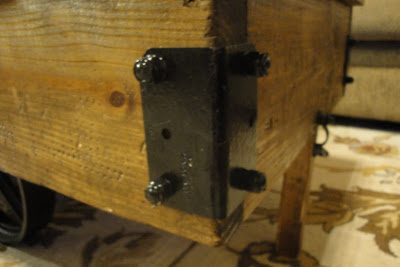
i wanted all of the detail of the restoration hardware table so i had to put my thinking cap on to replicate them. here's what i used. corner brackets, nuts, super glue and thumb tacks. i glued the tack to the nut...the nut to the bracket.


okay...the super glue was making me mad so i got out my old trusty glue gun (not the best idea)...here is what the finished product looked like. then i spray painted everything black.


once we added the axle holder and threaded the dowel and wheels, we had to level the table. we added the pulley wheel to one end and evened it up on the other with a 2 x 2.

we added all of the corner brackets.


see you later.
i have wanted one of these FOREVER. i had seen one at restoration hardware years ago http://www.restorationhardware.com/catalog/product/product.jsp?productId=prod1558003 it is just a tiny bit out of my price range. so i just forgot about it...until a few months ago (i really don't even remember what i was looking for) but i came across http://ana-white.com/2011/07/factory-cart-coffee-table this website is awesome. they have plans for everything. well it just gave me the boost i needed and so there i went half cocked and decided to try this myself.
i first searched the internet for new casters. i wanted the really big wheels. i didn't have much luck so i went to ebay and found some vintage ones. i searched for "vintage cast iron wheels". there were a lot to choose from. the price wasn't too bad but the shipping was crazy because they a soooo heavy. this is what i came up with.
 |
| this is actually a vintage pulley wheel |
 |
| these are cast iron antique wheels. |
1 - 2 x 8 x 6 board cut into 2 - 20 inch lengths
1 - 2 x 8 x 6 board cut into 2 - 40 inch lengths
2 - 1 x 6 x 10 boards cut into 8 - 24 inch lengths
save the scraps for other projects. i had the guy cut mine for some picture holders i will tut about later.
i brought all the wood home and let the kids loose with hammers, kitchen utensils, screw drivers, etc. we need some distressing. this table is 100 years old ;). it didn't just come from lowes 10 minutes ago. i just noticed that the kids do not look all that enthused about helping me with this project. it is about 4000 degrees outside. but they pulled through for me and beat the crap out of those boards.


we then dry fit the 1 x 6 pieces on top. (i have no pic of that ????) when we had them even on all sides we glued and nailed them. yes, nailed not screwed. according to my wise husband "they would not have used screws back then." so we pre-drilled and nailed all the boards in. and then the stain went on. i am usually a dark walnut girl but i am going a little lighter these days so i used a color called provincial. and i love it. it may be my new fav.
i wanted all of the detail of the restoration hardware table so i had to put my thinking cap on to replicate them. here's what i used. corner brackets, nuts, super glue and thumb tacks. i glued the tack to the nut...the nut to the bracket.


okay...the super glue was making me mad so i got out my old trusty glue gun (not the best idea)...here is what the finished product looked like. then i spray painted everything black.

here comes the tricky part. adding the wheels. my wheels i ordered came with an axle holder (technical term) so that made it easy to thread the dowel through. here is a close-up of it. you could also use a "u" bracket (the ones they use to hold up pipes.

once we added the axle holder and threaded the dowel and wheels, we had to level the table. we added the pulley wheel to one end and evened it up on the other with a 2 x 2.
 |
| nice flip flop under the table |

we added all of the corner brackets.

and a little extra detail.

wanna see it all together???

LOVE IT. hope you do too.
things i learned:
* this project was not as easy as i thought...mostly from mistakes i made.
* DO NOT use a pulley wheel...that was not the best choice. i liked the way it looked but i should have gotten an actual wheel. it was not easy to attach to the table.
* hot glue does NOT stick metal to metal. remember when i said the hot glue gun was not a good idea?...that is why. i have had to go back and reattach them with super glue.
* i wish i had gone bigger...although my hubby loves the size sooooo.......
* this was really hard to blog about. sorry if i totally confused anyone. please contact me with any questions and i will do my best to answer them.
jb
Sunday, August 14, 2011
ready 1...two...III and 4
hey every one...this is my first tutorial. but first, just a bit about myself. i am a "most of the time" stay at home mom. i work for an oil and gas company two days a week. i know...good gig, huh? i also have a website featuring my handpainted childrens wall art. i have two well behaved, quiet, still, well mannered, neat and clean boys 9 and 11 (we can all dream, can't we? ) and a wonderful husband. i LOVE all things crafty and will try almost any craft. i believe spray paint is a girls best friend and if you haven't noticed i like to type in lowercase. i love me some lowercase letters. i know...weird. i have a ton of projects all going on at once and hope to get them all on here at some point. my first tutorial is a set of numbered pillows i did. i saw these on one of my fav blogs http://abowlfulloflemons.blogspot.com/2011/04/link-party-tuesdays-one-project-at-time.html . here's the how-to.
i started out printing out the numbers and letters i wanted on my printer. i think it was called imprint something.

next i laid freezer paper on top of the image. yes freezer paper. who knew? it's over by the foil at the grocery store.

i cut out the image with an xacto knife to make my "stencil"

REALLY???? my hands look like i'm 80. anyway.
you then iron the freezer paper "stencil" to your fabric plastic-y side down. i have no idea if it matters but i turned my steam off on my iron. it will attach the paper to your fabric temporarily. btw- the "fabric" i used is painters drop cloths from Lowes. i washed and dried and iron them before i statred any of this. i may have to do a whole post on drop cloths. they are AWESOME.
again with the 80 year old hands.
after i ironed the paper onto the fabric i spray painted the pillow making sure the whole pillow was covered.

i absolutely could not wait until it dried so i peeled the freezer paper off right away.

after doing all of my pillows i let them dry overnight. and then sewed them to fit my pillow forms. and here's what i ended up with.
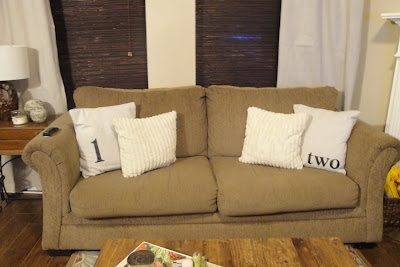


wanna see them all together???? huh????
 things i learned:
* i would have made my font bigger...much bigger
* the fabric spray paint is MESSY. i think i will sponge it on next time.
* maybe i would be a little more patient before i pull off the paper.
see that coffee table???...that will be in a post soon. my hubby and i just made that for our living room. hope you like this and i hope you'll come back. and don't forget to follow us and comment on posts so you'll be in the running for a giveaway.
jan
<a href="http://thediyshowoff.blogspot.com/" target="_blank"><img border="0" alt="The DIY Show Off" src="http://i899.photobucket.com/albums/ac195/Roeshel/DIYShowOffbuttonsmall.jpg" /></a><br />
i started out printing out the numbers and letters i wanted on my printer. i think it was called imprint something.

next i laid freezer paper on top of the image. yes freezer paper. who knew? it's over by the foil at the grocery store.

i cut out the image with an xacto knife to make my "stencil"

REALLY???? my hands look like i'm 80. anyway.
you then iron the freezer paper "stencil" to your fabric plastic-y side down. i have no idea if it matters but i turned my steam off on my iron. it will attach the paper to your fabric temporarily. btw- the "fabric" i used is painters drop cloths from Lowes. i washed and dried and iron them before i statred any of this. i may have to do a whole post on drop cloths. they are AWESOME.
 |
after i ironed the paper onto the fabric i spray painted the pillow making sure the whole pillow was covered.

i absolutely could not wait until it dried so i peeled the freezer paper off right away.

after doing all of my pillows i let them dry overnight. and then sewed them to fit my pillow forms. and here's what i ended up with.


wanna see them all together???? huh????

* i would have made my font bigger...much bigger
* the fabric spray paint is MESSY. i think i will sponge it on next time.
* maybe i would be a little more patient before i pull off the paper.
see that coffee table???...that will be in a post soon. my hubby and i just made that for our living room. hope you like this and i hope you'll come back. and don't forget to follow us and comment on posts so you'll be in the running for a giveaway.
jan
<a href="http://thediyshowoff.blogspot.com/" target="_blank"><img border="0" alt="The DIY Show Off" src="http://i899.photobucket.com/albums/ac195/Roeshel/DIYShowOffbuttonsmall.jpg" /></a><br />
Thursday, August 11, 2011
Reverse Applique...our first tutorial YAY
Hi there fellow crafters! I’m so glad that you found the “With Love Boutique” blog. I hope that you will find great info that will inspire you to get off the computer and make something beautiful. I am by no means an expert crafter, but I love to create so that helps : ) When I’m not crafting (which is mostly sewing) I am a loving and devoted wife and mother. It kind of makes it easy to be devoted and loving when you’ve got a husband and kids like mine, love you guys! I guess I’ve always liked to be crafty, but I’ve really gotten into it over the past several years. Last year I finally took the plunge and opened my own Etsy shop, The Paisley Rabbit, where I offer children’s clothes and accessories. Now, with two other incredibly talented ladies, my creations can be found at With Love Boutique at Frisco Mercantile. Happy blogging!!!!
I was going through one of my many overflowing drawers the other day trying to get rid of stuff. It’s just so hard to throw something out when you think that it could be put to good use one day, hmmmm I sound like a hoarder!
Anyway, I came across a tank top that I had totally forgotten I purchased. I also had some sparkly red fabric that I had used for my daughter’s July 4th shirt. I knew that I wanted to use it, but wanted to do something quick. I’m a huge fan of instead gratification ; )
I decided that my niece needed a new tank, so this is what I came up with.

This is a very simple reverse appliqué shirt that you can turn out in less than 30 minutes. That’s how long it took me and I had to stop a couple of times to referee a fight or two between my kids.
What you’ll need:
Tank Top (or any shirt really) – this is a great way to salvage those shirts that have a stain that you just can’t get out
Fabric for the appliqué
Marker
A Cut out of the design you want to use
Scissors
Sewing machine
The first thing you need to do is start with the fabric that you will be using for your appliqué. On the wrong side trace your design. You can find all kinds of designs on the internet, just google “free coloring pages” some will have pretty elaborate designs, but you can also find some simple ones.

Next, you will need to cut out your design. DO NOT CUT ON THE LINE THAT YOU JUST TRACED OF YOUR DESIGN!!!!! This line will be your guide when sewing, so just cut around the outside of the line.

Then you will need to secure the appliqué to your shirt. You will need to turn your shirt inside out. Place your design, right side down, on the shirt. You can get all fancy trying to get it perfectly straight, I just eye-balled it. Then, pin the tar out of it. I used lots and lots of pins!!!!!!

Now you’re ready to sew. Use the line that you traced as your guide and stitch all the way around.

You’re almost done! Turn your shirt right side out. Be very careful and cut just the shirt around the inside of the stitch you made around the design.

Now your little cutie has a new shirt!

Wednesday, August 10, 2011
in the beginning...
Hello world...or at least the dozen of you reading this. :) We are Jan, Lezlie and Michelle. We will be telling you more about ourselves as we post our tutorials. This post is about our exciting new venture...With love Boutique. We opened a booth at the Frisco Mercantile in Frisco Texas on August 1st. We are store #1407 if you want to come see our stuff. We have (the cutest...yes i said it...the CUTEST) handmade baby and toddler clothes, burp clothes, gift packages and more. In addition, we will have hand painted kids wall art. Don't live in Texas?...Don't worry. We all have links to our etsy stores and websites.
Coming up on the blog will be projects, tutorials and ideas from us with a little bit of daily life thrown in just for fun. I have about 4,329 projects going on at the same time right now. All of them started and NONE of them finished. I hope to get my first one on the blog in the next couple of days. In the meantime, Lezlie has actually completed a tutorial to share. YAY...we will put it and her bio up tonight or tomorrow. And Michelle will join us soon. It should be an exciting ride. Fasten your seat belts. We would love for you to come along.
Coming up on the blog will be projects, tutorials and ideas from us with a little bit of daily life thrown in just for fun. I have about 4,329 projects going on at the same time right now. All of them started and NONE of them finished. I hope to get my first one on the blog in the next couple of days. In the meantime, Lezlie has actually completed a tutorial to share. YAY...we will put it and her bio up tonight or tomorrow. And Michelle will join us soon. It should be an exciting ride. Fasten your seat belts. We would love for you to come along.
Friday, July 8, 2011
Subscribe to:
Posts (Atom)